The system files are the most important files that help in the proper functioning of the operating system. If these files are changed it might happen that your computer may not function properly. So it is always advisable not to play around with the system files. If at all you want to try out I advise you to make a backup of the desired system file you are going to replace in a safe location.
Now suppose you want to change the theme of Windows 7, you will need to change some system files as shell32.dll, explorer.exe & shellstyle.dll
Steps to replace system files in windows 7
1. First of all take the ownership of the respective file that you are dealing with. To take the ownership you need to download a specific registry file that will help you in taking the ownership. The file is called TakeOwnership.reg. You can download it from here takeownership.zip

2. After downloading the package extract it and install the takeownership registry file by double clicking on it to add Take ownership option in your Right-click menu. If anything prompts for user action, Click on Yes.

3) After taking ownership of the system file, you can rename the system files. Rename your system file to .bak.dll or .bak.exe or something else that you WILL remember. When you try to rename a system file, you will be prompted via UAC to confirm the action, do it.
System files, like shell32.dll, are protected. So, if you want to copy a file to the system32 folder, it won’t work.
So use command prompt window to rename it.
The syntax is :
rename path_to_system_file new_name
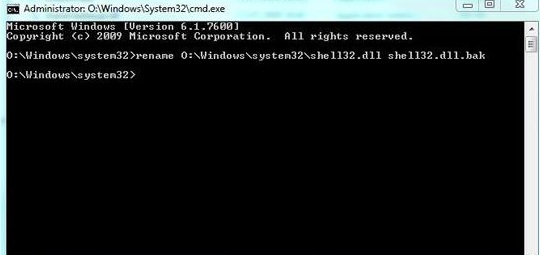
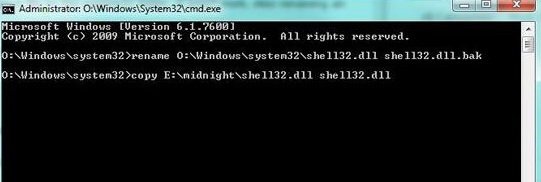
4) Copy your new system files to the system32 folder (or wherever your system files are stored) to replace the old files. Using command prompt the syntax is :
copy E:/midnight/shell32.dll shell32.dll
(Here my new shell32 was inside E:/midnight/)
And in this way you can replace any system file but always keep in mind to keep a backup of the original file.





Leave a Reply