No matter what operating systems you prefer for your use, all of you will agree on one point, that desktop of a computer is undoubtedly the most preferred location of saving files. You do not need to look for files from one drive to another. if the files are important and frequently used, then we prefer to keep them on the desktop. In the mean time, the desktop gets cluttered and unorganized. For macOS, Desktop Stacks organizes the desktop. Desktop Stacks are not new in Mojave, rather it made its first appearance with OS X Dock.
You can choose to have a group of items in the Dock appear as a Folder or as a Stack. The desktop implementation is new, however.) As the name implies, Stacks puts your desktop files into stacks. When you click on a stack, it expands to show the individual files. You can also scrub through a stack of files to find the one you need.

Steps To Turn On Stacks On macOS Mojave
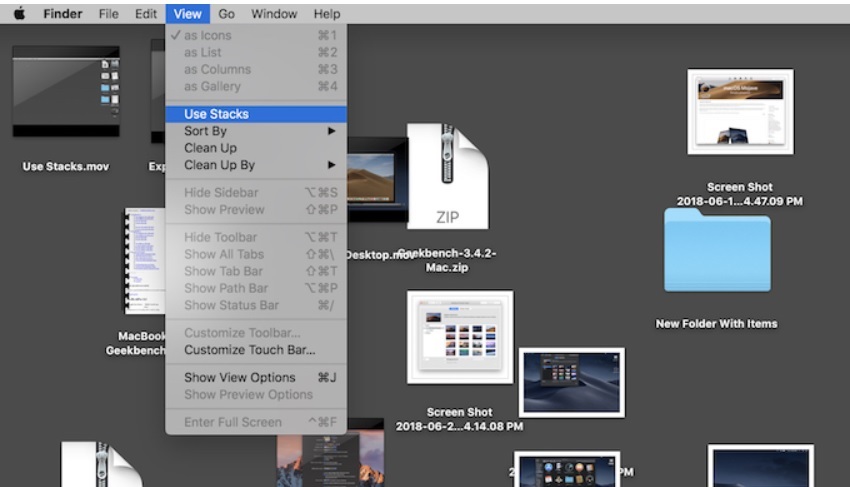
1. First, open Finder. Now, click on View in the menu bar.
2. Select Use Stacks. The default process of stack creation is grouping files by kind. The stacks then appear on the right side.
Steps To Open A file Using Stacks
1. Click on a Stack. The Stack then expands to display all the enclosed files.
2. Double tap on the required file. It will open with the default application assigned to it. You can change the default app by selecting open with option.
3. The Stack will expand even after you have opened the file. If you want to close the Stack, then click on the Stack icon, which will be shadowed. That’s all!
Now let’s have a look on how to scrub a stack and open a file.
How to scrub a Stack and open a file
1. First of all, move your cursor over the Stack that you want to access.
2. Next, slide your two fingers left or right on the trackpad to scrub through a Stack.
How to change how Stacks are grouped
1. Turn on Stacks and click on View.
2. Then go to Group Stacks By.
4. A menu will appear. you will get the desired options to group your stacks by certain methods. These methods are grouping by Kind, Date Last Opened, Date Added, Date Modified, Date Created, or by Tags.


Leave a Reply